Saturday, October 5, 2013

Teen Beach Movie Birthday Party

Teen beach Movie Birthday|Teen Beach Movie Party|Beachball Cake|Surf Cake|Teen Beach Movie|Petite My Sweets review|Party planning
Decorations
I'm not a high-end party stager. I like to convey a mood without going overboard on cost or construction. Personally, I'm not going to build anything out of wood and I'm not married to a man with a wood shop in the garage. So, I tend to stick with cardboard, foam core and recycled materials. I'm a huge fan of remnant fabrics to dress things up. In this case I found some cute pink surfboard fabric, retro motorcycle fabric and some tropical prints all for less than $5/yard.

The front porch was decorated with beach ball paper lanterns, boogie boards and a grapevine wreath decorated with tiny paper umbrellas (we had both components on hand already so this was free!). Each guest was greeted with a flower lei.


I set up a buffet for the food. 
I hung a motorcycle balloon over the drink table and a surfboard pinata by the snacks.
Vintage motorcycle fabric, helmet and balloon represent the Bikers.

Surfboard fabric and surfboard pinata represent the surfers.

Pinatas do double duty as both decorations and a party game
I made two foam core posters- a juke box and, of course, the Big Momma's signs. I'm really happy with how the Big Momma's sign turned out. I hand lettered the sign using magic markers then I traced each letter using plain white glue. I waited 24 hours for the glue to dry completely. The glue gave the letters a little dimension and shine similar to neon letters. It also created a resist that allowed me to paint the background of the sign to look like weathered wood.
Adding the glue over the letters


I spent a lot of time making the sign, but only about $4 on the materials. (Thanks to Dollar Tree.)

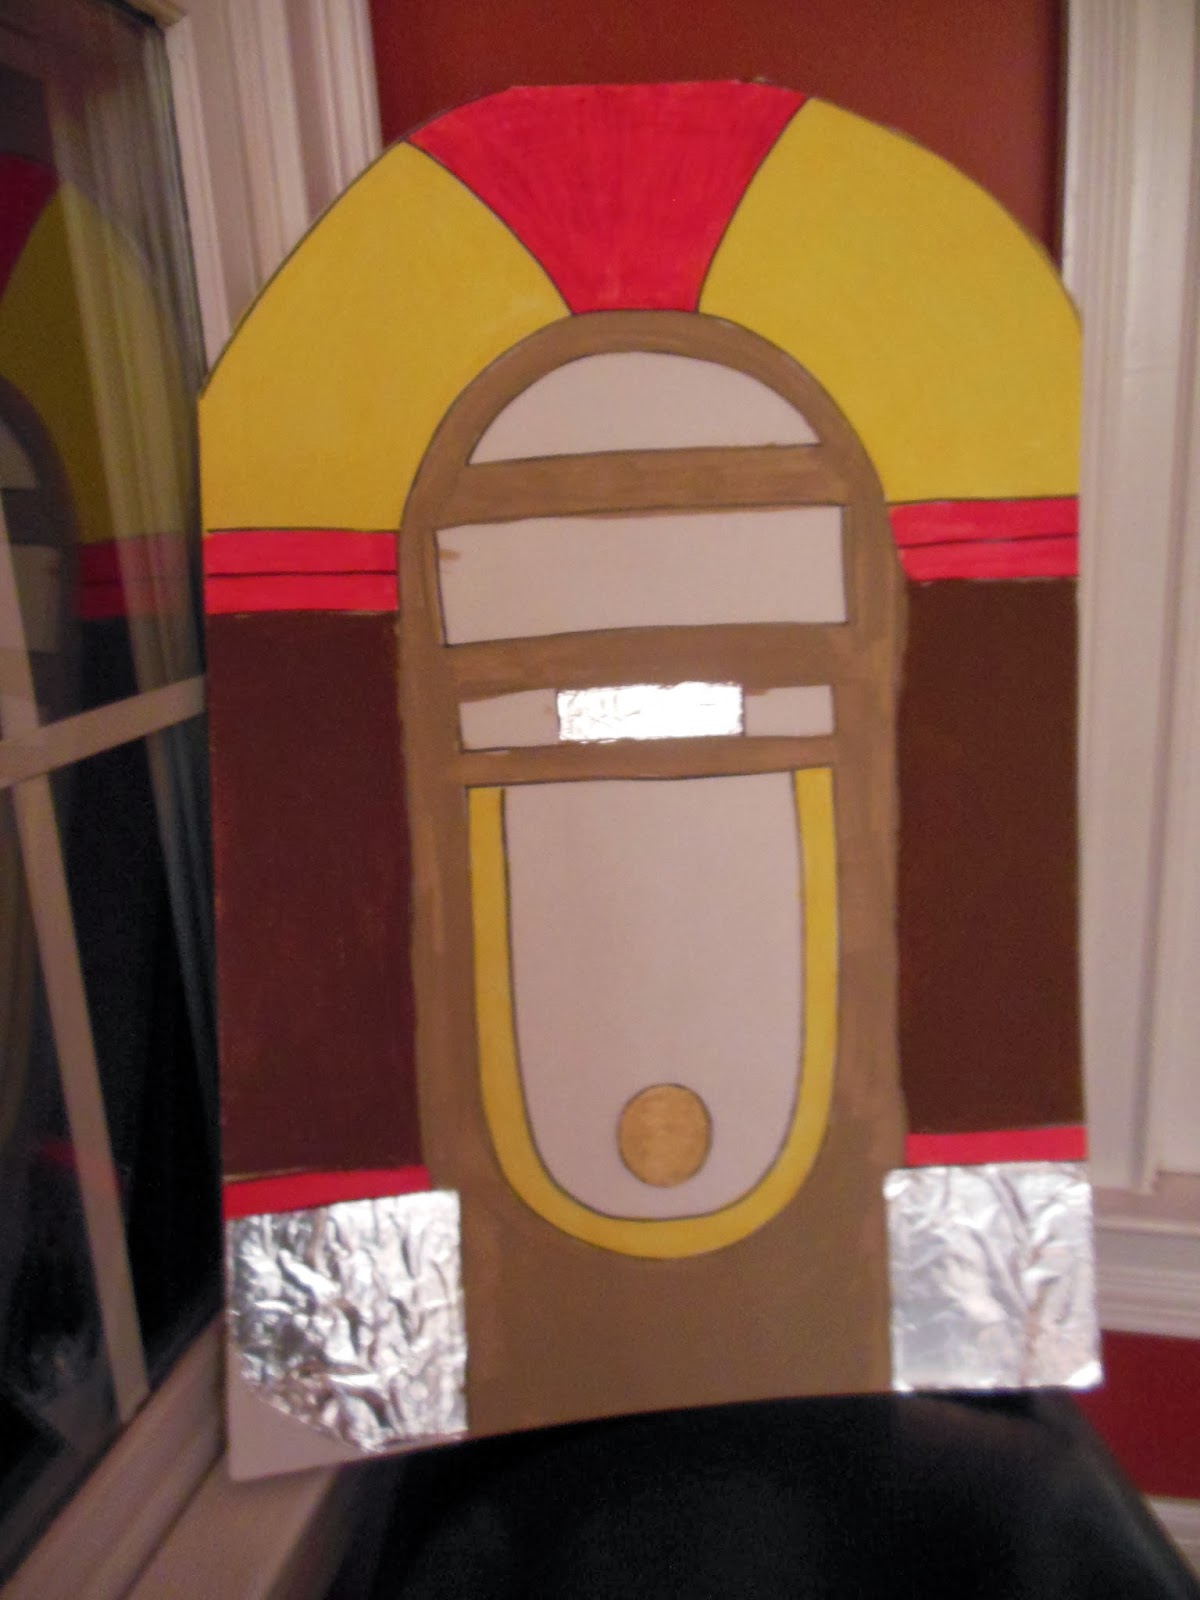
Our Ion juke box  is really a dock for an Iphone so we played the Teen Beach Movie soundtrack. Our party playlist also included an overview of early rock and roll: Beach Boys, Elvis and the Beatles and of course,  Wipe Out .

Danielle wanted there to be a Big Poppa's surf shop. I made another sign for a "surf" atmosphere. Cutting surfboards from cardboard is much harder than I'd expected. I would advise against it - my attempt at creating a surfboard was pretty lame.


I  decorated the backyard with bunches of balloons and tiki torches. I used a discount coupon to buy a helium tank for under $20 at Michaels' and  picked up the torches at the end of summer for less than $1 each.

Games
In the retro spirit, we kept the games simple.

First we divided the kids into two teams: Bikers and Surfers. I hid themed flags for each team around the back yard. The first team back with all of their flags won.

Next was limbo. The kids loved it!

The kids also played a chaotic version of volleyball. We used a giant beach ball for the game. We needed an air pump to inflate it. You can get one that is almost as big as the one  in the Teen Beach Movie promos, but it costs almost $100. Ours cost less than $10.

I wanted to have a hula hoop contest, but could only find 2 hula hoops in October.

Menu
We served kid-sized versions of classic diner food --mini corn dogs,small hamburger sliders, chicken nuggets and tiny tacos. There were chips, crackers, fruit kabobs and veggies with dip.

The kids sat on beach towels to eat.


I made this cake myself: chocolate motorcycle, brown sugar sand with fondant towel and surf boards.

Second cake - not finished in this photo. Wilton soccer ball pan covered in homemade marshmallow fondant
The rest of the dessert table was created by My Petite Sweets in Marietta, GA. What a disappointment! There was no artistry in the baked goods I received. Cake pops and marshmallows simply rolled in colored sugars. The cupcakes had two globs of frosting and a paper umbrella. I could have done that myself.

Worst of all, the chocolate dipped strawberries that were specially requested by the birthday girl were spoiled and moldy! The one child who ate one vomited before we discovered the rotten fruit.
Cupcake from Petite My Sweets
 I would have gotten better looking - and tasting!- baked goods from Publix.

Spoiled and moldy strawberries from Petite My Sweets

Marshmallows and cake pops from Petite My Sweets.
I made the chocolate motorcycle lollipops myself.

Danielle and I both love to give party favors. In general I prefer to give one big item that can be used again rather than a lot of little things that will be thrown out or vacuumed up. I considered giving  motorcycle helmets to the boys, but I couldn't find a similar item for the girls. Retro toys like jump ropes and marbles might be another good choice. Hula hoops would have been a great gender neutral party favor if I could find them.

I know a lot of parents hate goodie bags, but I think its important for the birthday child to give as well as receive. We had to go against my usual philosophy and hand out bags with several small toys- windup motorcycles,  shark tooth or flip flop necklaces, flower bracelet craft supplies, puzzle books and pencils.

We ended the party smashing open the surfboard pinata. Who doesn't love a candy free for all?

Backup Plan in Case of Rain or Cold Weather:
If it looks like bad weather you don't have to panic and put in a DVD of the  movie. Just put on your retro thinking cap. So many kids have never played classic party games! You can still play limbo and pin the tail on the donkey inside, but races are obviously out of the question.

Danielle asked that we create a scavenger hunt for her friends which is how we came up with Find The Flags. You can hide flags inside or you can print pictures of household items for team to find. For older kids, write out clues for specific items then have the Biker and Surfer teams find them.

You could also have the kids play indoor volley ball with balloons as long as there is nothing too fragile or valuable in the room.

Try playing Pass the Parcel using items that would have been prizes. Wrap a "big" prize in the center, then add a piece of candy or a smaller prize and wrap it. Add a little confetti and wrap the next item - and on and on...You can make any number of layers. You can use scraps of gift wrap, tissue paper or even plastic wrap. Some people wrap a random number of prizes; others make a layer for each child (good for younger children so that everyone gets a prize).

Another classic game involves food. Have the kids try eating hanging pieces of food. You can use doughnuts, apples or marshmallows -  anything you have on hand or might have been serving another way. The winner is one who finishes his or her piece fastest without using their hands.

Or try a pie eating contest using graham cracker tarts and canned whipped cream- if you don't mind the mess.

My Amazon Listmania List

My Teen Beach Movie Birthday Pinterest Board

Wednesday, August 28, 2013

Lela's Friends Forever Necklace...My Halloween DIY Adventures

Lela Friends Forever Necklace|Lela Pendant DIY|Lela necklace tutorial|Lela Teen Beach Movie
I have several friends who are amazing seamstresses. They make their children adorable outfits and fabulous Halloween costumes.

I can't sew. At all. I consider replacing a button a major accomplishment. I normally hope that the dry cleaners will notice missing buttons and replace them for me.

Several year ago I was tasked with making Amanda a "Jane Jetson" costume for a school performance. I made it with felt, glue and hem tape. I was extremely proud of it - until I saw photos of her. Poor child looked like she was wrapped in a pink trash bag. Lesson learned.

However as much as I detest actual sewing, I love creating costume accessories. Last year Danielle wanted to be The Scarlet Witch from Superhero Squad. She went trick or treating with her friend who dressed as Iron Man and Kevin who was extremely happy to play Wolverine.

Her costume was a shopping masterpiece. I found a red leotard, red cape and red boots. She had long red gloves. All she needed was the headdress. Yeah! A project for me. I looked it up on the web. I was a teensy bit disturbed to find examples in "adult cos-play".  Sounded a little kinky for a kid's Halloween costume. However I was able to copy the shape, not in vinyl, but in more age-appropriate stiffened red felt. The felt cost less than $1 at Hobby Lobby.

I bought her a Marvel Avengers trick or treat bag and hoped that when she showed up with Iron Man & Wolverine people would understand she was a superhero. I don't think anyone knew who she was. I don't think she cared. She was thrilled with her costume.

This year Danielle wants to be Lela from Teen Beach Movie. However, she doesn't want to wear the readily available pink biker chick outfit. Oh no, my darling daughter wants to dress like Lela from the most romantic scene in the movie, when she sings "Falling for Ya".Who can blame her? Grace Phipps is exquisite in this role - and she falls into Ross Lynch's arms. Little girl Heaven on Earth.

To be the perfect Lela we needed to track down a red polka dot sundress. Happily I found a wonderful seamstress on Etsy, Marie of SewCreationsBoutique, who made a darling retro red polka dot dress for about the price of the off the rack pink biker outfit.


Then all Danielle needed were the accessories. I vetoed super high black pumps (too hard to walk around the neighborhood in) and we compromised on black patent ballet flats. A black stain headband for her hair and we're almost there. However, we need one critical element - the Friends Forever necklace.

This adorable necklace mimics the flower on Mack's surfboard. Mack is the other female lead, played by Maia Mitchell. Mack and Lela become best friends and in one of the final scenes Lela gives Mack her pearl necklace.

Turns out the necklace in the movie was custom-made by the Art Department and there are no replicas for sale anywhere. Trust me, I looked! I even contacted Disney directly.

So, I decided to make one. How hard could it be, right?

 I had a bit of green polymer clay on hand. Don't ask me why. I've never made anything with polymer clay. I think I had it because it only cost 64 cents and I thought I might need it some day. Well, today was that day.

If you want to make your own: 
If you want to make your own, it's very easy! Each pendant will take 45 minutes to an hour to create.

I molded a tiny copy in green clay, having no idea how to work with it at all. Thankfully its very forgiving. I've worked with clay doing a bit of pottery so I guessed. My tools included a butter knife, a chop stick, a pen and a nail file. (I've since discovered that polymer clay isn't food safe. If you use a knife with this clay it should become your dedicated polymer clay knife - don't use it to frost a cake later.)


I made a sort of four leaf clover shape and pressed the tip of the chopstick in to create the flower petals. Next I made an elongated diamond for the background, again using the chopstick to create an indentation. After I created the two layers, I scored each of them with fine lines using the tip of the file and stuck them together.Finally I made a tiny ball and stuck it on for the center of the flower.

I made a thin rectangle with tapered ends for the loop to attach the pendant to the necklace. I pressed the layers together and touched up the details with the tip of a pen. Then, into the oven at 275 for 30 minutes as the package directed - with open windows and the exhaust fan running.

I let the pendant cool overnight and then painted it with some silver paint I had on hand. I used two coats of silver paint.  I tried both spray paint and acrylic. The acrylic adhered better, but obscured some of the details.

Once the paint was dry I filled in the depressions with a black Sharpie, then smudged the ink to give it a patina. It's not an exact replica, but its not bad for a few minutes work with materials I had on hand.

Oddly, the first one I made disappeared. I spray painted it outside. Maybe it blew away. So, take two:
I made this one smaller - so I used smaller tools

The back of the flower (and my green fingers)

Scoring the base 

Right before it went into the oven

Now, I just need to string about a million tiny pearl beads onto an elastic for the necklace....

Fortunately I found 100 pearl beads for about $2; the cord cost another $2.50. I made this for about $5 - an inexpensive accessory. The finished product lacks the beauty and flow of the original piece, but it will be fine for a 6 year old.

This is what it looks like painted silver. I need to apply the patina still.

I don't think anyone will know who she is again this year. Not that she'll care. She is just thrilled to wear the beautiful dress and look like Lela. I think whoever goes trick or treating with her needs to dress like a 1960s biker or surfer. I wonder if there will be Teen Beach Movie trick or treat bags for sale somewhere?

If you decide to do this I have a few suggestions for improvements over my version:

1) Use a more appropriate color of polymer clay. Sculpey clay comes in silver or pewter which would eliminate the need to paint. It only costs about $2.50. You'll have left over for future projects. Plus- after being worn a few times the silver paint started to rub off and the green showed though. Note: Having tried both Fimo & Sculpey clays, the Sculpey was much, much easier to work with as a novice. The Fimo crumbled and didn't blend well. Also, Fimo bakes at a lower temperature - read the package if you use it.

2) Smooth the surfaces really well before putting it in the oven. I thought it would melt a bit and smooth out, but the surface stayed very rough where I poked it with the pencil tip. I've learned that regular rubbing alcohol helps smooth the surfaces.

You might even want to invest another $3.50 in actual polymer clay tools instead of using random household objects like I did.

Danielle strung all of the pearl beads! It took her about an hour
3) When you are using a Sharpie to apply the "patina" do a tiny, tiny section at at time so the ink doesn't dry before you blot it. If it dries dark black  it looks horrible and it's hard to correct. Use a stamp replacement ink pad to blot each tiny area. Tissues and cotton balls only worked so well. You could also paint small areas black with acrylic paint.

4) We used Bead Treasures 4 mm "glass Pearls". I paid $1.99 for 100. We used 2 packages, but you could get away with one. The first necklace was strung on fishing line. We used the thinnest stretch cord I could find for the second one.


UPDATE: Polymer clay is pretty durable, but certainly not unbreakable! Our pendant has been through quite a bit since I created it in August. At one point Danielle pulled the pendant off of the hanger. Another time, the dog we were caring for chewed right through the hanger. Both times it was easy to repair with a bottle of Translucent Liquid Sculpey. I just used it like glue and re-baked the pendant as directed on the Sculpey packaging. After cooling, the pendant was as good as new.

THANKS SO MUCH FOR READING THIS!


Wednesday, August 21, 2013

Problem Pinterest Pins

Okay, I confess that I love Pinterest. It's my newest addiction - so much cheaper than EBay! However, like everyone else I've run across more than my share of Pins that simply didn't work, no matter how many times I tried them. There are also Pins that have hidden downsides like horrible odors, potential health risks or expensive ingredients. I've even started a Pinterest Board that I call "Pins that Really Didn't Work".

Here are a few that just didn't live up to their hype.

1) Sharpie Decorated Mugs

Sharpie inks aren't safe for food consumption so if you decorate a mug or plate with a Sharpie you shouldn't drink or eat from it. Also, while many Pins suggest that you bake these items to make the marker permanent it still isn't truly dishwasher safe and will fade after repeated washing.

If you want to decorate dishware that you can use, invest in a few Pebeo Porcelain markers.

2) Glow Stick Lanterns

If it sounds too good to be true, it probably is, right? First, its hard to get the glow chemicals out of the glow sticks and into the water. Second, when you do anything you accidentally get the chemicals on (like your fingers) will glow - fortunately the chemicals in glow sticks aren't toxic. There may be bits of fine broken glass in the liquid. Third, at least for me, it just doesn't mix with water well.

You can get a similar effect by simply activating a glow stick and submerging it in a bottle of water. The water will slightly magnify the glow. Just don't expect these to light a campsite at night.

3) Glow Paint "Firefly Jar"

The inspiration - I now think there is a light under the jars

This image is lovely! No wonder I wanted to try it. I even followed it back to the original post since I've seen several variations on it. I followed the instructions exactly.

I spent about an hour painstakingly dotting little dabs of glow in the dark paint around the interiors of two jars. I even used 2 different types of glow in the dark paint. I left my jars sitting under a 150 watt lamp for 12 hours.

Danielle and I ran outside with them hopefully at 9 PM. Nothing. Nada. They don't really glow.

Ours - taken with a long exposure and enhanced in Photoshop
The glow stickers we picked up at Dollar Tree were simpler to use and worked much, much better.

4) Mountain Dew Glow Lantern
I'm not sure why this one keeps resurfacing. Ask yourself, why would any soda make hydrogen peroxide and baking soda glow? Why Mountain Dew, not Sprite? This is a hoax, folks. Check Snopes if you don't believe me.

Oh, adding Starburst candies to Mountain Dew doesn't create a glow, either. If you read these pins one of the ingredients is a glow stick!

5) DIY Cleaners

DIY Dry Laundry Soap (small batch)
Lots of these are wonderful. They are simple to create, save money and work well. I now make my own laundry soap and dishwasher tablets. However, you'd better learn to like the smell of vinegar because it is  primary ingredient in most of these cleaners. Sometimes I wonder if Pinterest is surreptitiously sponsored by Dawn Dish Liquid and Heinz White Vinegar.

Cleaners that didn't work as well as reported (at least for me) include:

  • Spray on Shower & Tub Cleaner - vinegar combined with an equal amount of Dawn dish washing liquid. The instructions were,"Wait an hour and then simply wipe clean with a towel." I still had to get on my hands and knees and scrub. Maybe my shower was unusually gross?
  • Felted Wool Dryer Balls - Yes, these work. However, they require 100% wool which isn't cheap. You can make a dryer ball for free from things you have on hand. Wadded up aluminum foil, old tennis balls, bumpy dog toys, or mismatched socks rolled into a ball work equally well. Three or four will keep your laundry moving around and reduce your drying time.


6) DIY Gel Air Fresheners 

Am I the only one who remembers petri dishes from High School science classes?!? Please, please don't make these. While the ingredients are more natural than those found in commercially available gel air fresheners you are basically creating the perfect home for microbial growth when you make these using gelatin. If you read some of the blogs about these they comment that they lose their scent after a few days and begin to grow mold and bacteria after a week...

If you need an air freshener and want to make your own, use essential oils to scent a dry material like baking soda or kosher salt. Better yet, open your windows for a few hours and let some fresh air in.

7) Use Hot Vinegar to Clean Paintbrushes
Another use for vinegar - the darling of Pinterest posts.  I've seen Pins claiming as many as 1,600 uses for it around the house.

This comes from a credible source,This Old House. However, I microwaved white vinegar and submerged the bristles of several gunked up paintbrushes in it overnight. Not much happened. A little paint flaked off, but even after scrubbing them in hot water and soap they were still a mess. It didn't remove interior paint, chalkboard paint or acrylic craft paint from my brushes. Maybe my paintbrushes were beyond hope.

This was AFTER soaking for hours in hot vinegar then washing 

8) Vinegar & Listerine Foot Soak
This one was all over Pinterest and Facebook so I tried it.

This will leave your feet minty fresh. It will NOT remove callouses. Instead, soak your feet for 10 minutes in warm water then use a pumice stone to soften feet and remove dead skin.

However, vinegar & Listerine may help cure mild athlete's foot and toe nail fungus, so it's not a bad foot soak - just not a miracle cure for callouses & dead skin.

9) Hydrogen Peroxide & Baking Soda to Whiten Teeth

Yes, unlike using these ingredients with Mountain Dew to make a lantern, this works. However, it should be used with care. Baking soda is abrasive and can scrub the enamel right off your teeth. Lemon juice is another good tooth whitener, but the harsh acids can also erode the enamel on your teeth. And enamel doesn't grow back.

10) Glow in the Dark Bubbles
Apparently Pinners can't get enough of things that glow. This suggests that you break open a glow stick (see potential problems in #2) and stir the chemicals into bubble solution. Okay, that should make the solution glow. However, just like commercially available glow bubble solutions the bubbles don't noticeably glow. Disappointing. Maybe someone should suggest they add some vinegar? or baking soda & hydrogen peroxide?


Monday, August 19, 2013

Little Laundry Room - Big Dreams

decorating|makeover|laundry room reorganization
Boy,  does my laundry room need a make-over! And a good cleaning ;)

In all honestly, I love my little laundry room. I've lived in 5 houses and this in the very first with a real, bona fide laundry room. When we were first married the house we rented  had closets for the washer/dryer in the dining room. As odd as it sounds, it was very convenient because I could stack and fold laundry on the dining table. Of course, that meant we never actually ate at that table. Subsequent houses had the laundry in the garage, the basement and the hall between the kitchen and the garage. When we bought this house 9 years ago this felt like a huge move up - a room with an actual door of its own.

However, I haven't given my little laundry room the love it deserves, as you can see. The ugly truth behind that door:


Day One: Cleaning & Prep

This wasn't hard! Why didn't I do this earlier? It just looked overwhelming because so many things were crammed into such a small space. After a fun hour on Pinterest looking at amazing ideas that I can't possibly afford, and two not-so-fun hours cleaning this is what I had:

Clean, but boring


I also spent a little time, as my grandmother used to say, "shopping in my own store" -- looking around my house for things that would go with my intended color scheme (orange & aqua). I found a Crate & Barrel clock and some scrap-booking papers that I mounted in old frames. I also bought a tension shower rod to hang clothes & a trash can from Wal-Mart (total cost $12).

Check out my organized cupboards. I even labeled the doors. I painted what I swear will be the last chalkboard in the house (we have 5 already!) inside a cabinet door. Once I cleared out the things that had no business being in a laundry room (ice cream maker, beach towels, etc.) I had an empty cupboard for my paints & craft materials.


Day Two: Wall Prep and Paint Colors

Its raining today so I don't want to start painting. There are no windows in the laundry room which translates to poor ventilation. I'd need to leave the door to the garage open and I don't want to do that in this weather. I dusted, spackled and sanded. I taped the edges. I bought paint samples so we could see which we liked best.


If your laundry room looks even half as bad as mine, hop on over to decorchick.com and enter her laundryroom remodel & give-away for great ideas and a chance to win some funds to help with your own make -over! I know that I'm going to "borrow" a few of her ideas - and that awesome paint color! Bye-bye, bland off white walls!


Monday, August 12, 2013

Back to School Baking

back to school|berry muffins|banana muffins|strawberry banana mini muffins|no bake granola bars|chocolate protein bars|apple rice krispie treats|herbal detangler DIY|taming morning madness|snacks| quick breakfasts
As parents we all prep for back to school in our own ways. A friend of mine spent the night before school ironing and matching all of her daughter's clothes - down to the hair bows! I, however, spent the evening cooking and baking.

I'm not a morning person so I can't even get it together to take those all-important "First Day" photos. I normally cheat and take pictures on another day - after school.

I get clothes laid out and backpacks packed the night before. If the girls are taking a snack or lunch I pack it and put it in the refrigerator ready to go.

Morning madness includes getting fully awake, brushing two girls' hair and fighting tangles. (I'm so happy that we donated Amanda's hair to Locks of Love and I only have one with really long hair!) We struggle to eat a good breakfast in the short amount of time we have before the bus comes or we have to hop in the car.

My kids aren't very hungry in the morning so I really have to pack in the nutrition. Smoothies are always an option. You can buy bags of frozen strawberries, blueberries, etc. so you'll always have fresh fruit on hand. I make ours with plenty of protein. In addition to fruit, milk or juice and yogurt I add a scoop of whey protein powder or Instant Breakfast. 

I also use protein powder in my baking. If you use protein powder in baked goods you can usually add 1/3 cup of protein powder for every 1 cup of flour in the recipe. To keep them from being too dry, also add an extra 2-3 tablespoons of liquid. I don't use soy protein powder because Amanda is allergic to soy. However, I use a mix of flour and whey protein powder fairly often. When I use protein powder I reduce the other dry ingredients in a recipe slightly.


I try to provide make-ahead breakfasts. In addition to making my own whole grain waffles and pancakes and freezing them, I freeze batches of breakfast burritos and mini muffins. My girls also like granola bars and breakfast cookies. A few minutes in the microwave or toaster and they have a hot, homemade breakfast! And they can take it with them if we are running late...

Rice Krispie Apples - a cute first day treat for snack or after school!
  • 1 bag of marshmallows
  • 3 Tablespoons butter
  • 5- 3/4 cups Rice Krispies
  • 2 scoops vanilla protein powder
  • 1 package of red Jello (we used strawberry) 
  • red food coloring, optional
  • Tootsie Roll midgies (for stems)
  • green gumdrops or other gummy candies (for leaves)
Melt butter and marshmallows together. Stir in Jello (and food coloring if using.)
Add Rice Krispies and protein powder. Spray hands with cooking spray and form mixture into balls. Decorate with half a Tootsie Roll and a bit of green candy for a leaf.


 No Bake Chocolate Granola Bars
  • 1/4 cup butter 
  • 1/4 cup honey or corn syrup
  • 1/3 cup packed brown sugar 
  • 1 3/4 cups quick cooking oats {not rolled oats!} 
  • 1 cup crispy rice cereal 
  • 2 scoops protein powder
  • 1/2 teaspoon vanilla 
  • 4 tablespoons chocolate chips
Melt butter, brown sugar and honey together. Boil about 2 minutes to soft ball stage. Test by dripping a little from a spoon into a cup of cold water. If it turns into a ball, it's ready.
In a medium mixing bowl, combine dry ingredients (oats, cereal, protein powder & chips). If you don't have protein powder use 2 full cups of oats.
Combine butter mixture and dry ingredients. Stir until coated. The chips will melt. Spread onto a lightly greased pan. Press down hard. Allow to dry at room temperature for 2 hours.


  • 1 small overripe banana
  • 1/4 cup packed light brown sugar
  • 1/4 cup plain Greek or regular yogurt (vanilla, banana, coconut flavors also work)
  • 2 Tbsp vegetable oil
  • 1/2 tsp pure vanilla extract
  • 1 large egg - room temperature
  • 1 cup  flour (whole wheat if you have it)
  • 1/2 tsp baking powder
  • 1/4 tsp baking soda
  • pinch of salt
  • 5 medium strawberries, chopped - or 1/3 cup wild blueberries (available frozen)
Preheat oven to 350°F. Lightly grease mini muffin pan.
In a medium mixing bowl, mash the banana until no lumps remain. Whisk in the sugar, yogurt, oil, vanilla extract, and egg until combined.
Add in the flour, baking soda & powder, and salt. Mix just until combined. Fold in berries.
Spoon the batter into prepared pan.  If you have empty spots, add a little water to each to help the muffins bake evenly. Bake for 10 minutes.

This was originally a strawberry banana muffin recipe, but since Amanda is allergic to strawberries we changed it. Turns out that both girls like the blueberry version better!


Oh, I also made an herbal hair detangler. Let's hope it works!!
  • 8 ounces filtered or distilled water
  • 1 tsp aloe vera gel
  • 8-10 drops of apple cider vinegar or lemon juice (for blondes)
  • 2-3 drops glycerin
  • 1-2 drops of essential oil (I used lavender)
The original post called for grapefruit seed extract instead of the ACV, but i have some concerns about it. I think it was there as an acidifier  to lower the pH, which strengthens the bonds between the keratin molecules in the hair, smoothing and tightening each strand. That's why vinegar rinses work.
NO amount of fancy bows can hide those tangles!

So, what do you do to prep for back to school?