DIY disasters|How to make candy melt lollipops|Marshmallow Alien Pops|Ballet Slipper Cookies|Cream Cheese Frosting|Do It Yourself Craft
Every time I decide to try a new craft I naively think, "
This is it! This will be the one that I am good at; the one that will turn out exactly like the picture in the online tutorial." I get suckered in by articles that state "special tools and materials make this project a cinch.." They never mention that these special tools and materials will cost you an arm and a leg - and take several months to learn to use properly.
For Danielle's upcoming party I think I'm 0 for 5. Let's see... first there was the frosting fiasco. I beat the cream cheese frosting at "medium high speed for 5 minutes" exactly like the bag of confectioner's sugar instructed. I even set a timer so I wouldn't turn the mixer off early. Only- the instructions weren't for cream cheese frosting and I ended up with a delightful cream cheese soup. It really tasted great - it just ran right off the cake. I poured it into a Ziploc bag and tossed it in the freezer. I figure it will keep and maybe I can use it to ice cookies at some point in the future.
Next I tried the oh-so-easy ballet slipper craft. Seriously? Can anyone dip stuff in melted chocolate and make it look good?!? Most of the things I try look like hairballs my cat might have coughed up. And then the gleeful DIY fairy states that next you just, "pipe on the finishing details.." Ahh! And how do I do that, exactly? My attempt using a Ziploc bag as an icing bag was less than stellar. In fact, after several tries I gave up completely on the adorable ballet slippers and decided instead to serve simple pink sugar wafers (Goya $1.99/package) - no adornment required.
 |
| And this was the best I could do! |
The third thing I tried to make were the awesome marshmallow aliens. I fell victim to bad blogger syndrome when I wrote" No matter how tempting it is -
don't dip them in the food coloring! They will never dry... Trust me on this one." I should have come straight out and said that when I woke up the next morning my test aliens were still so sticky from being soaked in food coloring that they had slid down their little sticks, looking like they had all been lobotomized. I should have been truthful and written that I gave up on that plan and went searching for another, less sticky method of making alien marshmallow pops.
 |
| Now imagine these several hours later - looking like they'd been impaled through the head... |
Next I thought it would be nice to use up the candy melts since I'd spent $3 on them and already had lollipop sticks. I had a lollipop mold that I'd bought last year and never used. The pictures on it were lovely. "How hard could it be?" I wondered. I looked up the instructions on line and it was rated "easy". Sounds about right for me....
 |
| Wilton's flower lollipops -- |
The flowers actually were quick and easy even if mine didn't look
quite as nice as those on the package.
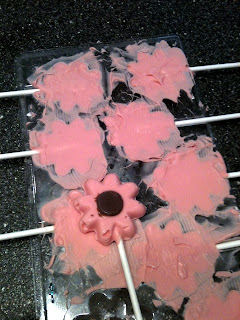 |
Tip: Tap the mold to get out air bubbles
or your flowers will look like bugs have gotten to them |
I got cocky. I pulled out the elaborate Halloween jack o lantern mold I had also bought last year. (I must have felt particularly ambitious last fall..) I figured that it couldn't be much harder than the flowers. Ha! My poor jack o lantern pops look like The Joker had a field day with them. Despite carefully applying melted chocolate with a tooth pick I had uneven eyes, large misshapen mouths, off kilter noses - and I was following a pattern in the mold! Imagine the mayhem if I had tried to free hand those bad boys.
 |
| I didn't even waste lollipop sticks on these monstrosities. |
To add insult to injury, when I unmolded them, many of the painstakingly applied chocolate details fell off! In the end I have to ask myself, why did I spend almost $15 and more than an hour's time making 16 flawed lollipops. For about the same price and amount of time I could have driven to a local chocolate shop and picked up an equal number of lovely, aesthetically pleasing chocolate pops.
For a true crafter I suppose there is value in having learned a new skill, produced something with your own hands, and used your time to make something that will bring joy to others. In my case, I have to confess that it really is all fodder for my true hobby - blogging.
If you've been keeping track You'll remember that I said that I was 0 for 5 on this party but I've only listed 4 of my craft disasters... I'm saving one for another time!
Here's to more craft experiments - and more posts. I promise to be more honest with you in the future. ;)